
How to Make Dreadlocks Using the Knotty Boy Method
The following step-by-step video is now also available on DVD, offering the convenience of being able to view it in way better quality from any DVD player, including hilarious DVD-only outtakes of our Knotty Boy stylists that make it worth every penny. Or, simply enjoy this free video and the instructions that follow with our compliments, for your viewing and learning pleasure!
NOTE: Thousands of people around the world in our Before & After Dreadlock Gallery attest to how quickly and easily they were able to grow gorgeous locks using Knotty Boy Dread Wax and our Loctician-Approved-Since-1998-For-All-Hair-Types Method for How to Make Dreadlocks.
However, you do not have to use recommended Knotty Boy products for this locking method to work. If you go wax-free, you must understand it will require the patience of the saints for your hair to form into true locks, and you will also have much less control over how your locks will appear throughout development, and in the end. (Which is exactly why we created Knotty Boy Dread Wax in the first place – better locks, easier and faster!) But if you choose to use no Wax, no worries! Simply skip over the Wax part of the Instructions, and use the rest of the steps to create product-free locks.
DETAILED INSTRUCTIONS
Step 1 {Gather Your Gear}
- one or two good buddies (and whatever you need to bribe them with!)
- Knotty Boy Dread Wax* or Roll-Up Stick
- conditioner-free Shampoo or Pre-Dreading Soap*
- strong, fine-tooth comb*
- hair elastics, barrettes or clips
- blowdryer
- old spoon
- old towel for waxy-hand cleanup
- nailbrush for cleanup
*These products, which you will also need for basic maintenance, are available at a savings in our Knotty Boy Dreadlock Starter Kits.

Step 2 {Washing}
To get your hair in the best possible form to start, wash your hair with your Pre-Dreading Soap twice. You can do it over two nights, but if you’re raring to go and just can’t wait, just wash, rinse and repeat. This bar is specially designed to cleanse your hair and scalp of any natural oily buildup that might hinder the locking process.

Step Three {Blow Drying}
Now that you’re squeaky clean, blow dry your hair upside down, sideways and back and forth until you’ve got it as big as it can possibly go! We know it looks ridiculous, but believe us, it’ll make your job a lot easier in the following steps. (By the way, this is a great time to take your ‘before’ picture to submit to the Before and After Dreadlock Gallery!)
When it’s 100% dry all the way through, you’re ready to start sectioning.

Step Four {Sectioning}
The key to easy-to-maintain locks is good, clean sectioning. It’s tempting to get lazy about this because it can get tedious, but down the road you’ll be so happy you resisted! We’ve found the best way to get started is to work horizontally, from the nape of your neck (aren’t you glad you brought along a friend?) and work your way up.
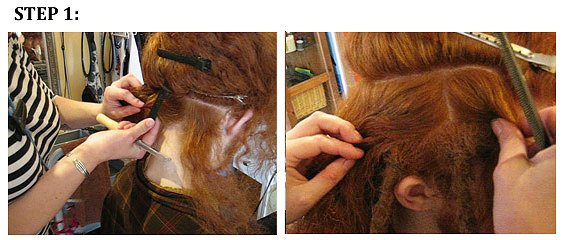
Photo 1: Lay Your Foundation
- Using your comb, section across the back of the head, parallel to your hairline. Pin or tie up all the hair above this line.
- Starting at the left or right hand side (whatever is the most comfortable for you) section out enough hair to grab an index-finger-sized lock. Pin the rest of the section out of your way.
If you’d like to pre-section your whole row, go ahead and do so with elastics or clips. While it’s pretty convenient to do this before backcombing and waxing, it isn’t necessary. So don’t get carried away here. Just pre-section only the row you’ll be working on.
Photo 2: Building Your Brick-Lay Pattern
When you’ve finished dreading the first row of sections at the back of your head, simply repeat this sectioning up and around your head, staggering your sections to lie between those below them in a brick-lay pattern. This will help your dreads appear fuller, because the ones above will hide that gap between the ones below! Take special care to stagger your sections at the top of your head, as this way you can change your part when the mood strikes. If you install a center part now, you’ll be stuck with it… forever! Or as long as you keep your dreadlocks, anyway.
Step 5 {Backcombing & Twisting}
Backcombing is exactly what it sounds like. Take your first section of hair, place the comb about one inch from the roots and comb the hair backwards toward your scalp again. You’ve created a tangle and pushed it up to your scalp in one motion. Start at the root and work down to the tip until you’ve created a tight and consistent texture, without any weaker thin spots. It’s really important that you get a good tight tangle going on up at your roots – this is what’s going to help your new hair-growth dread.
When you’ve got your section nice and knotty, twist it gently into a cylinder. You may be surprised to find this lock is a lot shorter than the rest of your unlocked hair, especially if you have quite fine hair. Don’t worry, you’re doing everything right. It’s normal for dreads to end up about 1/3 shorter than the length you originally started with.

Step 6 {Waxing}
When you open your jar of Knotty Wax, you’ll notice that the surface is really hard and smooth. The harder formula is great for keeping the Wax where you want it: on your dreads, not your face!
Take your spoon and dig into the surface of the Wax a little, so that you can easily take a pea-sized amount. Work that Wax in your fingers to soften it and ease out any clumps. Next, massage it in to your backcombed and twisted section, starting at the roots and working down to the ends. Take more small blobs of Wax as you need it, waxing and twisting as you go down the lock. Caution: You only need to use enough Wax to bind the loose hair together. Less is more! It’s much easier to add more later than to live with a waxy mess.
Note: If you’re using the new Knotty Boy Wax Stick, you’ll start at the root and just run the stick lightly down the length of the lock once or twice. No muss, no fuss!

Step 7 {Palm Rolling}
Once you’ve got your new lock sufficiently backcombed and waxed, you want to give it what’s called a ‘palm roll’. Start at the root and briskly roll your new dread between your palms to the end.
Dreads need friction to form, and this is how you provide it. Palm rolling will also be your #1 method for keeping locks going strong for the long-haul.
We can’t stress enough how important palm rolling is to maintaining neat and healthy locks!

Final Word
Now you just keep repeating the Backcomb-Wax-Twist-&-Roll process until you’ve finished your whole head. It may be time consuming, but it’ll be worth every minute.
Dreadlocks are a process and a journey – and you’ve just taken the first few steps by learning how to make them. Congratulations, and welcome to the Knotty Family!
We recommend you wait 1-2 weeks before your first washing to give those locks time to get really knotted up, and palm roll as often as you can. After this initial waiting period, washing once a week is a good guideline for most folks. Those of you who started your locks with our Knotty Boy Starter Kit will find our Dreadlock Shampoo Bar in the bag, along with a shower cap to keep your new locks dry during those other six days of the week!